Nowadays, most real estate photographers use HDR photography as their standard photography style. HDR stands for high dynamic range; it enlarges the difference between the darkest and lightest parts of an image. It usually involves blending multiple exposures to achieve this feature. A camera doesn’t calculate and compensate for light as the human eyes do. To achieve this, there is a need to create something that matches that look. Here is where HDR photography comes to play.
Real estate HDR photography involves creating appealing images to promote a property. Most real estate agents use HDR photography to offer better visual content for their property listings on billboards, social media, brochures, and websites. These images show both the exterior and interior of a property in a favorable way with the aim of enticing buyers to take a decision. HDR real estate photography helps to improve the realism and quality of an image.
This article will explore the HDR real estate photography tutorial for new photographers in the real estate industry. Furthermore, you will learn about some techniques that are beneficial for your real estate marketing.
What is High Dynamic Range Photography?
It deals with an image’s lighting conditions; the purpose of using HDR photography is to create an image with a higher dynamic range of light and contrast than standard shooting techniques and modes. HDR photography produces images that are similar to what the human eyes can create.

For instance, when looking at a room where some parts are brightly lit, and the other side is mired in shadow, your eyes frequently assess the room and enable you to adapt to changes in the light conditions. You would get the same effect for an HDR image. Instead of becoming dark and shrouded by shadow, the HDR composite balances these aspects to create an evenly exposed image.
HDR and Real Estate Photography
The real estate industry is a money-spinning one that thrives every day. Most real estate agent uses HDR photography to mimic how the human eyes see things. HDR real estate photography emphasizes every single detail when taking pictures. It often helps to balance interior spaces with exterior views. The HDR method works excellently in interior and real estate photography.
Here are a few benefits of HDR real estate photography
● Improved Textures: The process of combining HDR photos helps improve the overall texture. As you process the images using post-processing software like Photoshop, you’ll immediately notice the difference from the raw image because it looks sharper with greater clarity. Furthermore, it gives viewers an accurate view of the property.
● Greater Details: Creating an HDR image gives your property increased detail. When using a standard shooting mode with one exposure, it is easy to lose many important details. For instance, you can lose the aspects of the image
● Balance in shadows and highlights: Estate agent uses HDR photography for real estate because of the balance of shadows and highlights. Naturally, a good real estate photo shouldn’t have extremes. For instance, the image shouldn’t be too exposed with bright highlights or dark because of shadows. However, HDR composites help balance the photo when it is too exposed or dark.
Equipment for HDR real estate photography
To start things off, there are certain types of equipment you need for a good HDR image.
A sturdy tripod
You need a durable tripod, especially when shooting in brackets, because it will allow you to blend five different shots in one single scene altogether. These shots need to be closely aligned as much as possible. For a good HDR photography real estate photo, you need a good tripod that comes with a remote control or a tripod with a timer that automatically presses the shutter. With this, you can get the perfect alignment you need between all exposures.
Professional Camera
Notwithstanding your budget, you need a professional camera to get the perfect HDR image. You need a camera that can shoot a full-frame with sensors that adapt to low-
light situations. For instance, Canon 5Div or Nikon D810 are good examples that can give you the desired outcome.
A wide-angle Lens
In most instances, the significant difference of HDR photography for real estate lies in the lens. It doesn’t matter if it is an unprofessional or a professional real estate photo; the lens produces the outcome. A wide-angle lens of 18mm or below will enable you to capture the whole room. With this, the room looks bigger compared to using a lens with 24mm or 35mm.
The Technique of Shooting HDR Images
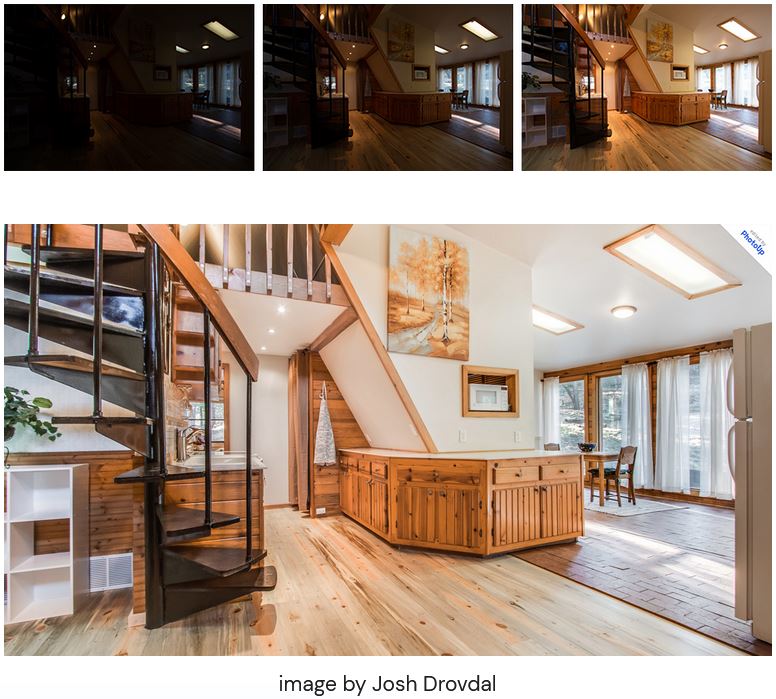
Most HDR images have a unique histogram on them. To achieve this feature, photographers take bracket images before combining them using a computer program such as Photomatix or Photoshop. If you are not into photography, you need to understand what a bracket image entails.
In the past, the common type of photography included photos that were shot in a single frame. However, technological advancements in digital photography and editing programs have made it possible to shoot multiple frames becoming combining them to form a composite image.
In shooting bracket images, you compose your images before shooting 3 or more frames at different brightness settings. Later, you would combine these images to form a composite image, which you can share or print.
Shoot with low ISO
To avoid noise in shadows and highlights, try to keep ISO low so the images come out crisp and clear.
Using RAW files
You should photograph at the highest settings. RAW files transform better when undergoing the editing process. RAW and TIFF both work very well.
Blending Images
The essence of shooting extra dark and light frames is to offer better detail in the highlighted and shadowed areas compared to what a single frame can provide. For darker frames, areas that are too bright in the middle are often exposed, which brings back details to other areas. However, to effectively restore the quality of the image, you need to blend the dark and light exposure using middle exposure. The easiest way to blend bracketed images is to use HDR programs such as Photomatix or Photoshop. However, these programs operate differently and might provide a different blend at the final stage.
How to edit HDR image in Photoshop
Photoshop is a unique software that allows you to create HDR images. Photoshop has several post-processing techniques that enable you to create an HDR effect in
photography. Although there are many photography programs that allow anyone to perform HDR editing, some of these are quite complicated and stressful. However, Photoshop is easy and straightforward in creating HDR images. Here at Homiesfoto, our Photoshop experts utilize HDR editing to make homes look as good as possible at a reasonable price.
In this section, you will learn how to create real estate HDR photography without any previous knowledge. Ensure you follow this HDR real estate photography tutorial to achieve perfection when it comes to creating HDR images in Photoshop. Without further ado, let’s unveil the required steps.
Step 1: Open Your Photos
After opening the Photoshop software, you need to open all the photos you want to blend. Open the individual layers in one file. After selecting the base photo, you need to click and drag the additional images from the Finder window. You can individually open all layers in Photoshop by clicking “Select All” before copying the base photo and pasting it.
On the other hand, if you use Lightroom for editing to import photos, you can select all the layer images you want to work on. Then, right-click and select “Edit in.” Furthermore, in Photoshop, select “Open as Layer.”
Step 2: Place all files in Order
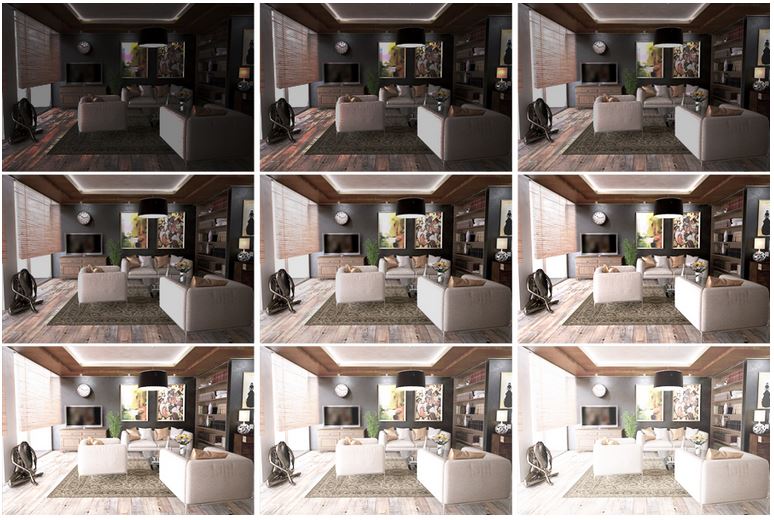
After opening the images in Photoshop, you need to place them sequentially to make it easier when working with them. Professionally, you should put the darkest exposure at the top before working towards the brightest exposure. Finally, you can finish it by taking the base exposure as the bottom layer.
Step 3: Add layers Mask
To add a mask to each layer, you have to click the “Add layer mask” button located at the bottom of the Layers panel. Once you click this, it creates a mask that appears white. With this, the entire area becomes visible. However, to make it invisible, you can use the keyboard shortcut – Ctrl + T to invert the layer. With this, the layer mask thumbnail turns black. You can continue the process for other images.
Step: 4 Brush Part of the Mask
The next step is to brush the top layer to make it visible. Here, you can use the “Eraser” tool, ensuring that the eraser color is set to black. The black color will make the layer appear, whereas white will make it disappear.
Additionally, you can adjust the severity, size, and opacity of the brush using the setting in the top panel of the software. Furthermore, you can fine-tune the overall opaqueness of the masked layer. Fine-tuning the opacity will help produce a more subtle effect for the entire layer.
Step 5: Continue the masking effect
You can continue the entire process until you reach the specific layer intended for the outside view. You have to do this differently because it has harder edges that most brushes can’t handle. For the dark layer with the outside view, you can mask it just the way you did with the others. Rather than using the “Erase” tool directly, you can use the Polygonal Lasso Tool first. You need to select the edges you want to expose carefully.
For instance, if the photo has an outside window view, you can use a lasso on all the edges of the window view. However, ensure you avoid the frame and other objects that might be at the window front. Select the outside view immediately using the “Lasso” tool. You can use the erase brush tool in the same manner as you did with other layers.
Step 6: White Brush for Correction
Before saving, you need to use the white brush for any image corrections. When masking and revealing each layer, you can switch the brush color to white to erase the masked layer. For instance, you can reuse the white brush to correct the image if you reveal too much.
Step 7: Save your work
The final step is to save your work after completing the process. In Photoshop, you can save the layered image as a Photoshop file for easy referencing. Nevertheless, if you use Lightroom when saving, it will create a new layer file before automatically adding it to your Lightroom gallery. Finally, in Photoshop, you can merge the layers and save them as a JPEG file.
Tips for Real Estate HDR Photography
At times, it is easy to overlook the process of creating a real estate HDR photography and come up with an image that looks suspiciously balanced. Nevertheless, you need to create something authentic. When editing, you must balance the exposure between the interior and outdoors of your image. To achieve this, you must leave the exterior overexposed to a certain extent. This helps to bring a more natural feeling when looking at the image.
Similarly, when brightening any dark spot, you need to leave some shadows in the image. If you make the dark spot areas too bright, they might look like a washed spot. To keep the image more realistic, you should moderately use the tone and detail part. Similar to any editing method, HDR is a great tool at your disposal. Nevertheless, it should be used in balance and when needed. To be good at it, you need to experiment more with different images.
Conclusion
Going through our HDR real estate photography tutorial, you’ve probably already learned quite a bit on how to create an HDR image in Photoshop. You now have a better understanding of how HDR photography can improve your real estate images.
HDR has great benefits and potentials, especially when creating a balanced image with realistic lighting conditions. Plus, it deals with challenging lighting conditions that many photographers face when taking an interior shot.
HDR is an essential tool when working in an industry such as estate and interior photography. Interestingly, there are several ways to incorporate HDR into your editing. We’ve mentioned how you can do that and get the perfect HDR photography for real estate images for your client. Remember, you can always experiment to get a better outcome.
Here at Homiesfoto, we've been working with HDR raw images for years. Check out our services and get some free real estate test edits.


![How To Remove Wires And Lines In Photos [GIF Tutorial] 2023](https://storage.homiesfoto.com/Data/2021/10/22/4-zoom-in-on-wires-and-lines-637704985694662256.jpg?w=100)